Learn how to quickly get started with Wordbee Terminology Extraction. The term extraction is a dedicated module that helps your teams get terminology prepared for any project in a simple way at any time. This module features a term extraction tool that recognizes possible terms from documents and presents them in term collections. The Terminology Extraction module is integrated, which means that you can preview and filter the results of the term extraction and create termbases with the related terms directly in your Wordbee Translator platform. It also features export and import capabilities for standard exchange of data and for teams to continue their terminology work offline. By means of TBX files or Excel Templates, term collections can be conveniently prepared offline and imported back to the system to ultimately create terminology databases. For more details, see the main features and benefits from Wordbee Term Extraction.
How to access the Terminology Extraction module
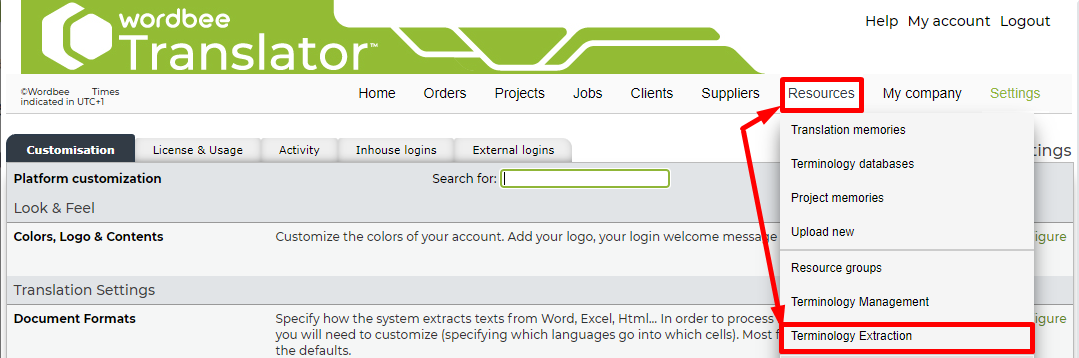
Go to Settings and select Licenses & Usage from the drop-down menu.
Go to Details and open the Terminology Extraction tab to see its status and the credit available.
If the Terminology Extraction module is activated, go to Resources and click on Terminology Extraction to create your first term collection.
How to run the Terminology Extraction tool
Follow the steps below extract terminology from your working files:
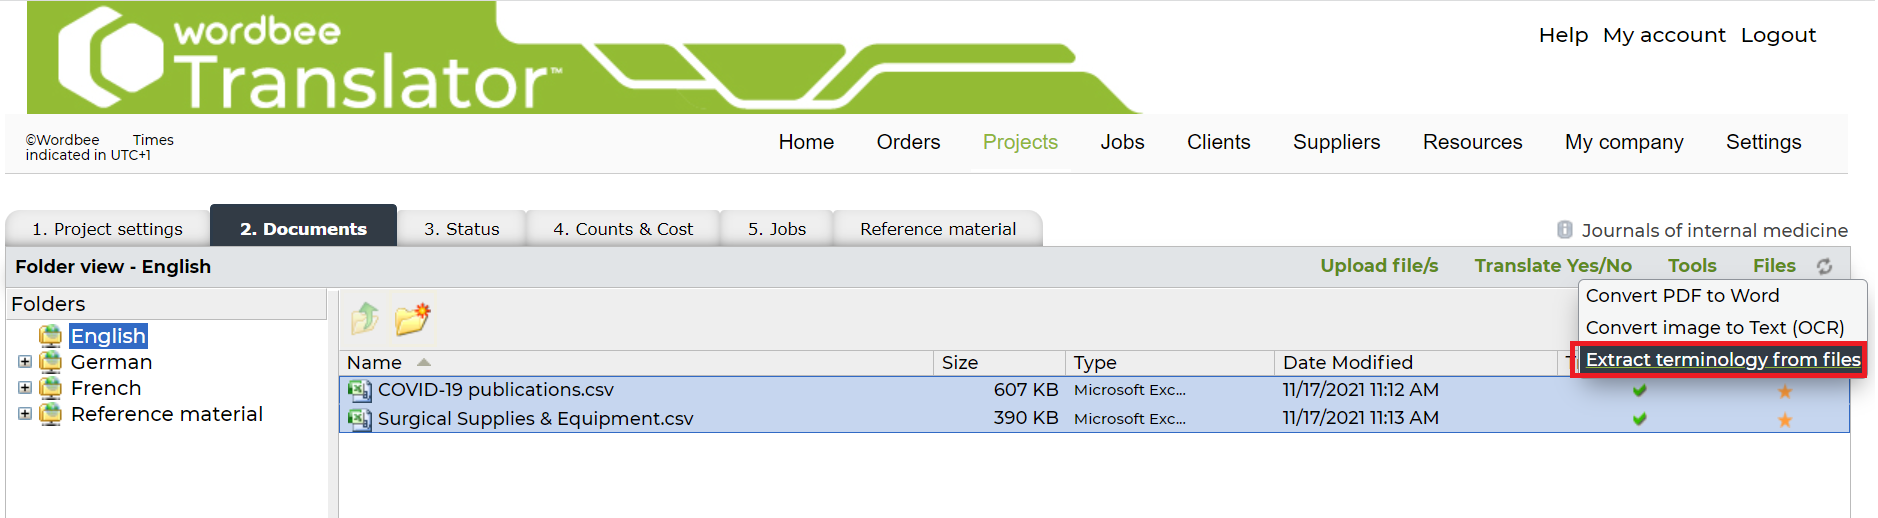
Go to the 2. Documents tab of any project and prepare your file(s) for online translation.
Then, select the file or files you want to extract terms from and click under Tools > Extract terminology from files.
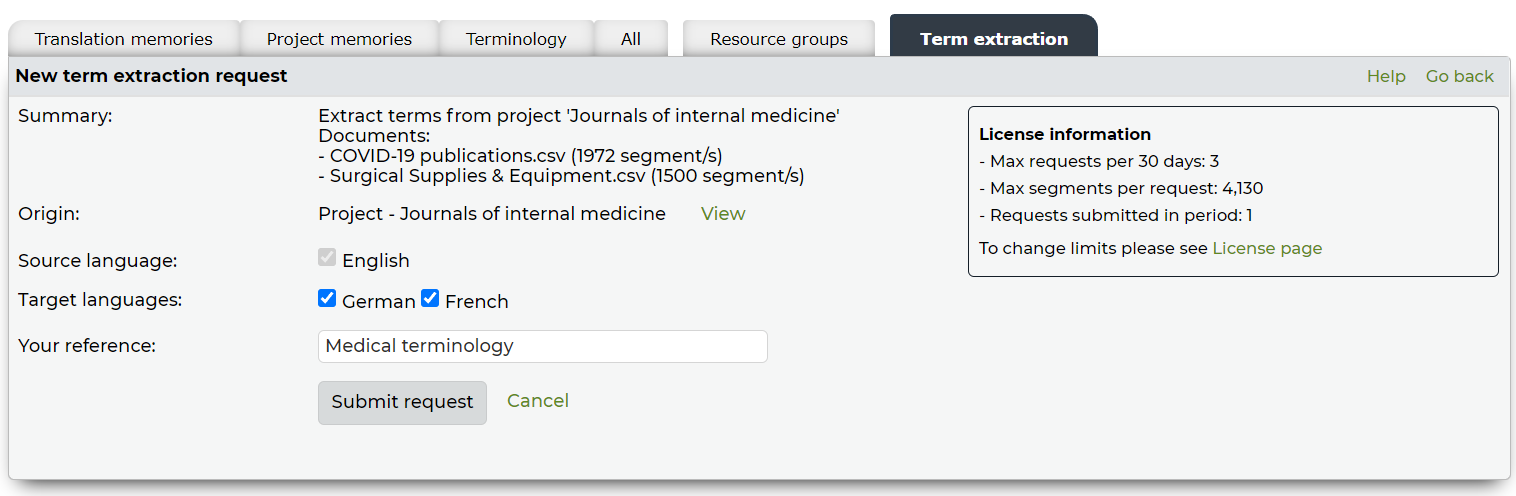
Review all details before launching the text extraction request. Make sure the languages and the reference are right so you can easily find the results later in the system. Click Submit request to when you are ready.
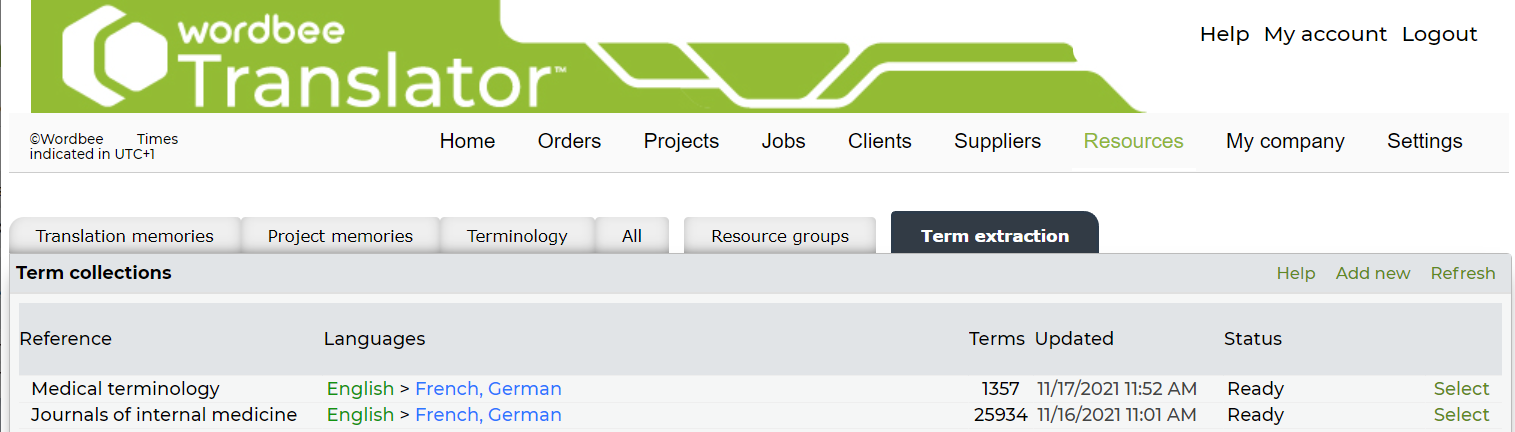
The request is now being processed and a term collection is added into the system to present the results of the extraction*. Depending on the size of the files, the results should be available within minutes.
*Find all your extractions requests in the Term extraction section of the platform (Go to Resources > Term extraction).Check the status of your request in the list of term collections. Once it is updated to “Ready”, you will be able to see the terms detected in your files. Click “select” to see more details for any collection.
Every time you submit documents for term extraction, you will get a reminder on the features and credit included in your subscription plan.
This is how a sample term collection issued from an extraction request looks like

Let us now take a look at the Terminology Extraction module with some basic scenarios.
When to use the terminology extraction tool?
Extract terminology from your working files. Step by step guide
Cases:
- Prepare your project before translation starts. Extract terminology from existing files that have been handed over for translation. These files can be monolingual or multilingual.
- Get the most out of your translation. Run the terminology extractor after the project is completed to document the most prominent terms
As a project manager, you can use term extraction to get term candidates detected in your files and create a list of what you consider should be the terminology for your project. This whole process is custom to your needs, so follow the steps below and adapt when required.
Run the extraction as explained in the How to section above.
Once the results are ready in your collection, narrow down the list of candidates by using the filters.
Use the preview and the statistics to get a rough idea of where to define your threshold and decide what you will focus on.
Remove filtered terms if you need to get rid of some of the raw data.
Export* your collection into Excel for further analysis and clean-up. Validate the results of your work with your stakeholders
Import back your file only the terms that are worth documenting. The terms you keep in your collection will be the ones used for creating a database once you decide the work for each language pair is done.
Create a database with the languages of your collection. This operation can be done:
for the source language on its own
for each target language.
As a result:
- you can create monolingual or bilingual terminology databases with your terms and their contextual examples for later reference. These are stored in standard TBX fields.
Add the new termbase to your project so it can be referenced during the translation process. Activate the QA flag in the project if you want to flag inconsistencies when QA checks are done.
*if you Export the collection in TBX you can import the clean results as a Terminology database directly into the related section of the system. See the Learn more section for more details
Use the option “Copy terms to another collection” to merge the terminology work done in one or several collections. The data for that language will be aggregated into another existing collection or you can create a new one as you go.
When to create a new term collection?
Create the right terminology framework for your project. Step by step guide
Cases:
- You already have good terminology in one language and you want to translate that into other languages.
- You will start all terminology work from scratch.
This case is slightly different than the above. Teams can decide to start terminology work from scratch with no term extraction required. Use a new term collection term to get a basic Excel template that will serve to document the work to be done for each of the languages required. This is how the process will look like:
Access the term extraction module in Resources > Term extraction:
Create a new collection by clicking add new in the Term extraction list. Enter at least two language(s) you will be documenting.
Use the language selector to focus on a given language.
Get your template for offline work by clicking Export excel.
Depending on the language you chose, this template can be monolingual (source language) or bilingual (target)
Import the Excel back once you are done with the work for that language.
Repeat this process with any of the languages you wish to include in your terminology database.Use the filters and preview options available to see how the work is progressing.
Create a database with the languages of your collection. This operation can be done:
for the source language on its own
for each target language.
As a result:
- you can create monolingual or bilingual terminology databases with your terms and their contextual examples for later reference. These are stored in standard TBX fields.
Add the new termbase to your project so it can be referenced during the translation process. Activate the QA flag in the project if you want to flag inconsistencies when QA checks are done.