[Personal comment: Not happy with this page - need to improve the layout and give some clear examples. Sara explained the CF. ]
How to get here
Go to Settings and search for Terminology Management.
Use Configure to access the Customization page of Terminology management and TBX.
Go to Access rights > Custom field and click on Configure custom fields.

Create a custom field
In the Customization screen
, open the Segments tab to define additional input fields for your translation memories and terminology databases. The fields
you define here will visible in the Translation Editor. You can create up to 20 custom fields per category.

Use Add to create a new custom field.
The Edit custom field screen opens
.
Name
your custom field
and fill in a description, if necessary.
Select the resource type where you want the custom field to appear: Translation/Project memories, Terminology databases, Both.
Select the field type
:
Text field
Pick list
Hyperlink
Image
, Picklist, Hyperlink, Image, Checkbox
Indicate whether the field is mandatory or not.
Indicate where the custom field can be searched for: Translation editor, Global Search, on top, or Global Search,
sidebar.
Indicate whether the custom field should be displayed in the hits of the Translation Finder
Set access rights for internal users: hidden, can view, can edit.
Set access rights for external users: hidden, can view, can edit.
Indicate whether the custom field should be attached to segment, language or both.
Click OK to save the changes.
Wordbee automatically assigns the custom field an internal custom field ID for advanced use cases.
As soon as you click OK, the custom field is listed in the Custom Fields for Segments.


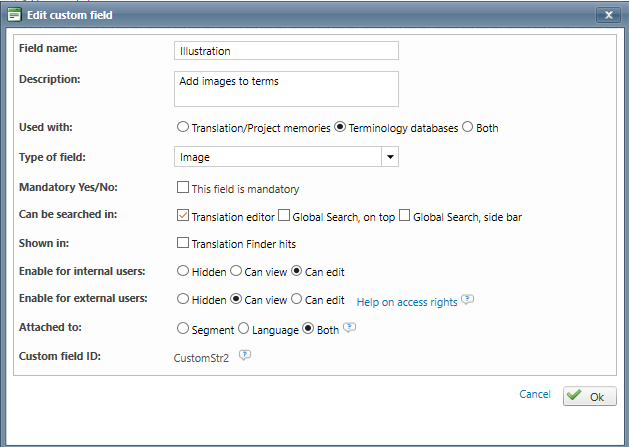
Example
For example, let us assume that you would like to create a custom field called Illustration where you can add an image to represent a concept in the terminology database. Further you could grant editing access to your internal users and only viewing rights to your external usersYou can now add an illustration to your terminological entries.

Enable the custom field in your termbase configuration
You have successfully created the custom field but you still need to define it as a valid TBX field. To do so:
Go to Settings > Customization > Terminology Management and TBX.
In the global list of fields, select the custom field you have just created and push it on the concept or term level to the working template.
Save the changes.

When you reopen your termbase, you should be able to see the custom field on the concept and/or term level (whatever you have selected above).